Tag Archives: java

Summary of the Oracle JDK8 MOOC

Introduction

In a previous post I summarised the new functional features of Java 8. Oracle has recently released a 3-week JDK 8 Massive Open and Online Course called “Lambdas and Streams”, which discusses the new JDK8 functional features in much more details. It’s a great course and if you’re interested in Java and new JDK8 it can help you get started. This article summarises the course and my previous post and can be used as a quick ref-card.

Lecture 1: Lambda Expressions

Lambda Syntax

To understand lambdas, first we need to understand functional interfaces. In Java 8, an interface is called functional, if it has only one abstract method. In previous Java versions, all interface methods were abstract. In Java 8 interfaces can have default and static methods as well. In order for an interface to be function it should have exactly one abstract method regardless if any default or static methods are defined. It is recommended to annotate functional interfaces with the @FunctionalInterface annotation so that the compiler can check if they meet the requirement.

In Java, a lambda function can be thought of as a syntactic short-cut for defining anonymous instances of functional interfaces. Lambda expressions are defined with the following pattern:

(param1, param2, ... , paramN) -> expression | block of code

If the parameter list has only one parameter, the brackets can be omitted. Note that there are no types in the lambda definitions, as types are automatically inferred from the functional interface definition. Types can be defined explicitly, but this is not required. The body of the lambda expressions can be either a single expression (whose evaluation is the result of the function call) or a block of code, similar to a method definition. The following examples demonstrate functionally equivalent definitions:

Comparator<Integer> cmp1 = (x, y) -> x.compareTo(y);   // Expression body. Types NOT specified
Comparator<Integer> cmp2 = (Integer x, Integer y) -> { // Block of code body. Types specified
    return x.compareTo(y);
};
Comparator<Integer> cmp3 = new Comparator<Integer>() { // Java 7 style
    public int compare(Integer x, Integer y) {
        return x.compareTo(y);
    }
};

Runnable r1 = () -> System.out.println("Test");         // Expression body
Runnable r2 = () -> { System.out.println("Test"); };    // Block of code body
Runnable r3 = new Runnable() {                          // Java 7 style
    public void run() {
        System.out.println("Test");
    }
};

Alike anonymous classes, lambdas can use the variables of their environment. When using local variables in lambdas, the must be effectively final, which means they are not assigned to from anywhere, regardless if they are actually marked as final.

Method References

Lambdas are a neat way to implement functional interfaces, but often all they do is call an existing method. To make things simpler Java 8 introduces method references. Method references are a shorthand for implementing functional interfaces by calling already defined methods.

There are four types of method references:

Reference to Syntax Lambda Equivalent
Static method Class::staticMethod (param1, … paramN) -> Class.staticMethod(param1, … paramN)
Specific instance’s method var::instanceMethod (param1, … paramN) -> var.instanceMethod(param1, … paramN)
Instance method Class::instanceMethod (var, param1, … paramN) -> var.instanceMethod(param1, … paramN)
Constructor Class::new (param1, … paramN) -> new Class(param1, … paramN)

The following examples demonstrate equivalent definitions with method references and lambdas:

Predicate<String> p1 = Boolean::getBoolean;         // Static method reference
Predicate<String> p2 = s -> Boolean.getBoolean(s);  // Equivalent lambda

String var = "TestEquality";
Predicate<String> p1 = var::equals;         // Specific instance's method reference
Predicate<String> p2 = s -> var.equals(s);  // Equivalent lambda

Predicate<String> p1 = String::isEmpty;     // Instance method reference
Predicate<String> p2 = s -> s.isEmpty();    // Equivalent lambda

Predicate<String> p1 = Boolean::new;           // Constructor reference
Predicate<String> p2 = s -> new Boolean(s);    // Equivalent lambda

Functional Interfaces in the standard library

The standard library has always had a bunch of functional interfaces – Runnable, Callable, Comparator etc. Java 8 introduces a whole new package of functional interfaces called java.util.function.

In Java there are two kinds of types – referential and primitives. Java generics can only be used with referential types – e.g. List<int> is invalid. Thus, the java.util.function package contains multiple versions of each interface – a generic version for referential types, and specialised versions for the primitives. For example we’ve got Consumer<T> and IntConsumer. In the rest of the article we’ll look at the generic interface only.

The main functional interfaces in the package are:

The consumer interfaces in the above list have a default method andThen, which takes as an argument another consumer. The result is a new consumer instance, which runs the two consumers one after the other, as in the example:

//Define two consumers
Consumer<String> helloConsumer = name -> System.out.println("Hello, " + name);
Consumer<String> byeConsumer = name -> System.out.println("Bye, " + name);

//Create and call a composite consumer which “chains” the previous two
Consumer<String> helloByeConsumer = helloConsumer.andThen(byeConsumer);

// Prints "Hello, Guest\nBye, Guest"
helloByeConsumer.accept("Guest");

The andThen default method of the function interfaces works similarly – it chains the function invocation as in f(g(x)). The compose method does the same, but swaps the functions – i.e. g(f(x)) instead of f(g(x)). The following example demonstrates this:

UnaryOperator<Integer> plus1 = x -> x + 1;
UnaryOperator<Integer> mult2 = x -> x * 2;

//Create a new function with andThen
Function<Integer, Integer> plus1Mult2 = plus1.andThen(mult2);
System.out.println(plus1Mult2.apply(1));// Prints 4

//Create a new function with compose
Function<Integer, Integer> mult2Plus1 = plus1.compose(mult2);
System.out.println(mult2Plus1.apply(1)); // Prints 3

Note: in the above example you may wish to use IntUnaryOperator instead of UnaryOperator<Integer> to avoid excessive boxing/unboxing.

Similarly, the predicate interfaces have default methods and, or and negate, which can be used to create new predicates with combined logic.

New Methods in JDK 8

The Java 8 standard collections library introduces several new methods which use functional interfaces:

Also, many methods of the standard Logger have been overloaded to take as an argument a Supplier<String> instance, instead of string. For example, when the Logger.fine(Supplier<String>) method is invoked it will only call the provided supplier if the logging level is below or equal to Fine. Otherwise, the supplier will not be called leading to fewer operations like string concatenation and formatting.

Lecture 2: The Streams API

Streams

JDK 8 defines a stream as a sequence of elements. Streams of referential elements inherit from the Stream<T> interface, and there are specialised interfaces for streams of primitives. Once again we’ll only consider the generic types, as the primitive streams offer analogous functionalities.

Streams are usually used in a pipeline of operations, where each operation produces or transforms a stream until a result is derived. Hence, each stream operation can be can be classified as:

  • Stream source – generates a stream;

  • Inermediate operation – processes a stream;

  • Terminal operation – given a stream, yields the final result.

StreamOverview

Sources of streams can be collections and arrays through the following methods and their overloads:

Other typical sources of streams are random number generators (see Random), lists of file paths (see Files) and list of lines in a text (see BufferedReader).

The generic Stream<T> interface and its primitive counterparts provide several utility source functions for creating or transforming streams:

The intermediate operations are usually implemented as methods of the Stream<T> interface and its primitive counterparts. The most important are:

The methods mapToInt, mapToDouble, and mapToLong are handy when converting/mapping a stream of objects to a stream of primitives.

The terminal operations are special, as they cause the pipeline to be evaluated. Prior a terminal operation, the stream operations are only “accumulated” or delayed. This allows the terminal operation to execute effectively (e.g. in parallel) on the aggregated stream.

Most often you would probably use one of the following terminal operations:

Other frequently used terminal methods are count, max, and min, which return Optional instances.

Optionals

In Java 8, Optional<T> is a container which holds a reference to an object or null. It is used to avoid excessive null checks throughout the code. It can also be thought of as a stream which has either 0 or 1 elements. In that sense, it is a generalisation of the rule that you should prefer to return empty collections and arrays from methods, rather than null.

The count, max and min methods from the previous section all return optionals, whose embedded value is null if the stream is empty.

Instead of doing a null check, you can use the ifPresent(Consumer c) method to run code if the optional contains a value:

Optional<String> opt = …

// Will print only if opt refers to a non-null value
opt.ifPresent(System.out::println);

You can also use the filter and map methods, as you would do with streams.

Lecture 3: More Advanced Lambdas and Stream Concepts

The Stream.reduce(BinaryOperator) method is a terminal operation which aggregates the stream to a single value. The provided operator is applied to null and the first element, then its result and the second element are fed in the operator and so on … until a single value is achieved. There is no guarantee as to the actual sequence of execution, but the result is always as if the aforementioned procedure is executed. This can be used to implement things like computing the min, max or sum of all elements. In fact, streams already have predefined short-cut methods for these functionalities. The reduction mechanism is a generalisation of this concept, and the reduce method has overloads providing additional parameters.

Given an infinite stream, the Stream.findFirst and Stream.findAny methods are typically used to terminate it and return a value matching the specified predicate wrapped in an Optional. The findFirst method returns the first match, while findAny can return any match thus allowing for parallelism behind the scenes.

// Find a random positive and even integer
int r = Random.ints().findFirst(i -> i > 0 && i % 2 == 0);

int[] a = new int[] {1, 2, 3, 4, 5, 6, 7, 8, 9, 10};
// Can return either 2, 4, 6, 8, or 10
int i = Arrays.stream(a).findAny(i -> i % 2 == 0);

Another terminal operation is Stream.collect(Collector) which converts the stream to a container – usually this is a collection or a string. The collector parameter defines how the stream elements will be converted to the resulting container. The Collectors class defines utility methods for instantiating and combining common collectors.

Stream<Integer> s = Arrays.stream (new Integer[] {1, 2, 3, 4});

// To list and set
List<Integer> lst = s.collect(Collectors.toList());
Set<Integer> set = s.collect(Collectors.toSet());

// Map of same keys and values
Map<Integer,Integer> map = s.collect(Collectors.map(Function.identity(), Function.identity()));

// A string of all values with a separator
String toString = s.collect(Collectors.joining(","));

Streams can be serial or parallel. All operations on a sequential stream are run in sequence on a single thread. Operations on a parallel streams are run in a thread pool using the Fork Join framework. The size of the thread pool is determined by the number of available processors, but could be overridden by setting a system property.

Parallel streams can be created directly from collections through the parallelStream method. Every stream can be made parallel or sequential with the respective stream methods.

.NET for Java Devs in a nutshell

Introduction

.Net is a software development platform, which allows code written in different languages to interoperate. C# and the .Net model have some resemblances with some java-based technologies. This article aims to briefly explain some of its core concepts by comparing and contrasting the two “worlds”.

Specifications and Implementations

There are several main specifications which define what .Net actually is:

  1. The Common Intermediate Language (CIL or just IL) is a language independent representation of compiled code. Similarly to java byte code, which can be compiled from several of languages (Java, Scala, Jython etc.), CIL can be compiled from a multitude of languages.
  2. The Common Language Runtime (CLR) is an execution environment (like the JVM), which executes CIL code. It manages threads, garbage collection, just-in-time (JIT) compilation etc.
  3. The Common Type System (CTS) defines all data types and programming constructs supported by the CLR, and which can be described in CIL. In java terms, you can think of it as a specification of the JVM’s types and constructs.
  4. The Common Language Specification (CLS) is a subset of CTS. Not all languages support all features of the CLR runtime (i.e. CTS). For example a language may not have unsigned long. The CLS defines a subset of CTS, which should be supported by all .Net languages. If some code needs to be integrated with other languages, it’s externally visible interface (function signatures, member variables etc.) must only use CLS types. There are ways to make the compiler enforce that. There is no similar concept in the java world, and all languages must support all JVM types in order to interoperate.
  5. The Framework Class Library (FCL) and its subset the Base Class Library (BCL) define the standard library functionalities, which can be used by all languages. In a java environment, the alternative would be the standard java library.
  6. The Common Language Infrastructure (CLI) is a “master” specification, which includes all previous ones (CIL, CLR, CTS, CLS etc.) and defines their relationships. .Net is the most famous implementation of CLI. Mono is a major multi-platform open source alternative. In November 2014, Microsoft announced it will open source .Net core (the fundamental part of .Net) to GitHub and will start working to make .Net multi-platform (as of now it works on Windows only).

Relationship between specifications

Assemblies

In .Net assemblies are files (*.dll or *.exe) which contain compiled CIL code and a manifest. The manifest defines the assembly’s name, version and dependencies/references to other assemblies. An assembly is basically packaged compiled code, and a similar java concept would be a JAR file. A JAR file also has a manifest, but is not required to contain name, version and dependencies/references. Some component models (e.g. OSGI) demand that jar files’ manifests contain such information.

A Jar file is in fact a zip archive, and can be easily opened and explored. A .Net assembly on the hand can be explored with a tool called ildasm.exe, which ships with .Net.

Assemblies can be built with the respective compiler for the used language (e.g. csc for C#), similar to the javac and jar utilities. A response file (*.rsp) can contain multiple build instructions and configurations. Assemblies can also be built with an IDE like Visual Studio, SharpDevelop or MonoDevelop.

The Global Assembly Cache (GAC) is a repository, which contains assemblies reusable between multiple applications – mostly system binaries. Users can install assemblies in GAC using system tools, which ship with .Net, although this is not advisable.

Big projects need tools to manage the dependencies on components (assemblies or JARs) and to automate the build. In the java domain, tools like Maven and Gradle can be used. In the .Net world, NuGet can be used to manage assembly dependencies. Integration with Mono on non-Windows systems seems to be in progress. MsBuild seems to be the preferred automated build system for .Net. It also allows you to build Visual Studio solutions and projects without Visual Studio.

In .Net assemblies are not only deployment artefacts – they are also logical entities. For example C# defines an access modifier called internal, which denotes that the respective member can only be accessed from the same assembly. Similarly members with modifier protected internal can be accessed either from the assembly or through inheritance. There does not seem to be an alternative to this in Java. In OSGI you can achieve similar access restriction by specifying which JAR/bundle packages are visible to the outside world.

REST with Embedded Jetty and Jersey in a Single Jar – Step by Step

Introduction

Setting up a simple RESTful development environment to play with can be surprisingly difficult. Furthermore, if you’re using Java you may have to use different IDE plugins (e.g. for Eclipse or NetBeans), and to rely on the IDE’s integration with a web server.

In this tutorial I will show how to set up a RESTful server (Jetty+Jersey) to start from a standard Java main method. Furthermore, using Maven we’ll package the entire application in a single executable jar file, which can be started from any machine with a Java environment. Finally, we’ll see how to import it into Eclipse, so we can develop and debug there.

Prerequisites

Before following this tutorial you should have JDK 7 and Maven 3.2 or later installed on your system. Installation instructions can be found here:

If you plan to work with Eclipse, you will need Eclipse IDE Java EE Developers.

Maven Project

First, we need to create a simple maven project called restprj. We do so by using the simplest quickstart maven archetype. It creates a simple App java class and an AppTest unit test for us. We’ll delete the test, as we won’t need it for now:

mvn archetype:create -DgroupId=com.rest.test \
         -DartifactId=restprj \
         -DarchetypeArtifactId=maven-archetype-quickstart
cd restprj
rm src/test/java/com/rest/test/AppTest.java

Now we need to edit the pom.xml file to include the following dependencies:

<dependencies>
  <dependency>
    <groupId>org.eclipse.jetty</groupId>
    <artifactId>jetty-server</artifactId>
    <version>9.2.3.v20140905</version>
  </dependency>
  <dependency>
    <groupId>org.eclipse.jetty</groupId>
    <artifactId>jetty-servlet</artifactId>
    <version>9.2.3.v20140905</version>
  </dependency>
  <dependency>
    <groupId>org.glassfish.jersey.core</groupId>
    <artifactId>jersey-server</artifactId>
    <version>2.7</version>
  </dependency>
  <dependency>
    <groupId>org.glassfish.jersey.containers</groupId>
    <artifactId>jersey-container-servlet-core</artifactId>
    <version>2.7</version>
  </dependency>
  <dependency>
    <groupId>org.glassfish.jersey.containers</groupId>
    <artifactId>jersey-container-jetty-http</artifactId>
    <version>2.7</version>
  </dependency>
  <dependency>
    <groupId>org.glassfish.jersey.media</groupId>
    <artifactId>jersey-media-moxy</artifactId>
    <version>2.7</version>
  </dependency>
</dependencies>

Note that there may be newer versions of these dependencies. Visit http://mvnrepository.com/ to check for new versions.

Server and REST service

Now we need to create a simple test REST service class EntryPoint:

package com.rest.test;

import javax.ws.rs.GET;
import javax.ws.rs.Path;
import javax.ws.rs.Produces;
import javax.ws.rs.core.MediaType;

@Path("/entry-point")
public class EntryPoint {

    @GET
    @Path("test")
    @Produces(MediaType.TEXT_PLAIN)
    public String test() {
        return "Test";
    }
}

Afterwards we need to update the main class (i.e. App.java), which will start the server:

package com.rest.test;

import org.eclipse.jetty.server.Server;
import org.eclipse.jetty.servlet.ServletContextHandler;
import org.eclipse.jetty.servlet.ServletHolder;

public class App {
    public static void main(String[] args) throws Exception {
        ServletContextHandler context = new ServletContextHandler(ServletContextHandler.SESSIONS);
        context.setContextPath("/");

        Server jettyServer = new Server(8080);
        jettyServer.setHandler(context);

        ServletHolder jerseyServlet = context.addServlet(
             org.glassfish.jersey.servlet.ServletContainer.class, "/*");
        jerseyServlet.setInitOrder(0);

        // Tells the Jersey Servlet which REST service/class to load.
        jerseyServlet.setInitParameter(
           "jersey.config.server.provider.classnames",
           EntryPoint.class.getCanonicalName());

        try {
            jettyServer.start();
            jettyServer.join();
        } finally {
            jettyServer.destroy();
        }
    }
}

Building a Single Uber Jar

This step is in fact optional. It allows you to create an executable single/uber jar file with all dependencies. You can then execute it from any java-endabled machine. To do so, update the pom.xml with the following:

<build>
  <plugins>
    <plugin>
      <groupId>org.apache.maven.plugins</groupId>
      <artifactId>maven-shade-plugin</artifactId>
      <version>1.6</version>
      <configuration>
        <createDependencyReducedPom>true</createDependencyReducedPom>
        <filters>
          <filter>
            <artifact>*:*</artifact>
            <excludes>
              <exclude>META-INF/*.SF</exclude>
              <exclude>META-INF/*.DSA</exclude>
              <exclude>META-INF/*.RSA</exclude>
            </excludes>
          </filter>
        </filters>
      </configuration>

      <executions>
        <execution>
          <phase>package</phase>
          <goals>
            <goal>shade</goal>
          </goals>
          <configuration>
            <transformers>
              <transformer
                implementation="org.apache.maven.plugins.shade.resource.ServicesResourceTransformer" />
              <transformer
                implementation="org.apache.maven.plugins.shade.resource.ManifestResourceTransformer">
                <manifestEntries>
                  <Main-Class>com.rest.test.App</Main-Class>
                </manifestEntries>
              </transformer>
            </transformers>
          </configuration>
        </execution>
      </executions>
    </plugin>
  </plugins>
</build>

Now you can build and the run the jar file:

cd restprj
mvn clean install
cd target
java -jar restprj-1.0-SNAPSHOT.jar

At this point you can open http://localhost:8080/entry-point/test in your browser to test the web service.

Eclipse

This section is also optional. It describes how to import the Maven project in Eclipse, so you can run and debug your app from there.

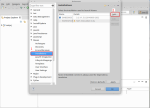
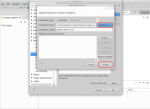
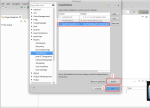
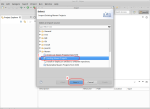
First you need to set up the Eclipse maven environment:

Then you need to import the project:


References

This post is based on the following StackOverflow discussions:


C# pitfalls for Java Devs – Static Members in Template Classes [Part 2]

Introduction

Previously I discussed one of the major differences between C# and Java – method overriding. Because of it Java and C# code, which look almost identical, can have very different semantics. Similarly, C# and Java generics differ significantly in terms of the underlying semantics, which can be quite confusing for a Java programmer.

Example

Let us consider the following seemingly analogous code snippets implemented in both languages.

C# code:

public class Animal { }
public class Lion:Animal { }
public class Bear:Animal { }
public class Cage<T>
{
    private static int instanceCount = 0;
    public Cage()
    {
        instanceCount++;
    }
    public void PrintInstanceCount()
    {
        System.Console.WriteLine(instanceCount);
    }
}

Java code:

public class Animal { }
public class Lion extends Animal { }
public class Bear extends Animal { }
public class Cage<T>
{
    private static int instanceCount = 0;
    public Cage()
    {
        instanceCount++;
    }
    public void PrintInstanceCount()
    {
        System.out.println(instanceCount);
    }
}

Now let us consider the following invocations:

Cage<Animal> ca = new Cage<Animal>();
Cage<Lion> cl = new Cage<Lion>();
Cage<Bear> cb = new Cage<Bear>();
ca.PrintInstanceCount();
cl.PrintInstanceCount();
cb.PrintInstanceCount();

Many will be surprised to see that the results are different, as per the following table:

Command\Language C# Java
ca.PrintInstanceCount(); 1 3
cl.PrintInstanceCount(); 1 3
cb.PrintInstanceCount(); 1 3

Java implements type erasure, which means that type parameters are erased at compile time and at a runtime there is a single class for each template. Thus, in the previous example at runtime there is a single static member variable for all instances of Cage, independent of the type parameter.

Conversely, the C# compiler (i.e. the Just In Time compiler – JIT) ensures that all closed types (e.g. Cage<Lion> and Cage<Bear>) have their own static fields. Thus to the programmer they seem as different types/classes.

Consequences

As a result C# does not let you access the static members of a template class without specifying the template parameters:

Cage.instanceCount = 5;         // Invalid in C#, Valid in Java
Cage<Lion>.instanceCount = 5;   // Valid in C#, Invalid in Java
Cage<Bear>.instanceCount = 5;   // Valid in C#, Invalid in Java

Also C# does not let you have an entry point (i.e. a Main method) in a template class.

C# pitfalls for Java Devs – Overriding [Part 1]

Introduction

Last week I finally had the time to learn a bit of C#, after a number of years of mostly Java coding. Professional C# developers have described it to me as a “better Java” or “Java with syntactic sugar”, and have claimed that Java programmers should not have problems picking it up. It is true that both languages have a lot in common – i.e. the C-like syntax and single inheritance. However, there are some quite fundamental philosophical differences, which can be mind-boggling for a Java programmer.

One of these is method overriding, which is fundamentally different in Java and C#.

Example

Let us consider the following seemingly analogous code snippets implemented in both languages.

C# code:

public class Base
{
    public virtual void F()
    {
        System.Console.WriteLine("Base::F()");
    }
    public void G()
    {
        System.Console.WriteLine("Base::G()");
    }
}
public class Der : Base
{
    public override void F()
    {
        System.Console.WriteLine("Der::F()");
    }
    public void G()
    {
        System.Console.WriteLine("Der::G()");
    }
}

Java code:

public class Base
{
    public void F()
    {
        System.out.println("Base::F()");
    }
    public void G()
    {
        System.out.println("Base::G()");
    }
}
public class Der extends Base
{
    public void F()
    {
        System.out.println("Der::F()");
    }
    public void G()
    {
        System.out.println("Der::G()");
    }
}

Now let us consider the following invocations:

Base d = new Der();
d.F();
d.G();
((Der)d).F();
((Der)d).G();

Many will be surprised to see that the results are different, as per the following table.

Command\Language C# Java
d.F(); Der::F() Der::F()
d.G(); Base::G() Der::F()
((Der)d).F(); Der::F() Der::F()
((Der)d).G(); Der::G() Der::G()

Java always invokes the method of the actual class of the object. In other words, the actual method is not known by the compiler – it is decided on at runtime. C# has this behaviour only if the method is declared as virtual (e.g. F()). The invocation of non-virtual methods (e.g. G()) is decided by the compiler, before the execution.

In other words, Java keeps it simple, by always deferring the decision until runtime. This is called Dynamic binding, and causes a certain performance penalty, because of the runtime object inspection. In contrast C# does it the C++ way, and supports both dynamic and static binding. By default methods are bound statically at compile time, unless they are marked as virtual.


Syntax specifics

In Java it is a good practice to annotate overriding methods with the @Override annotation. This signals the compiler to validate that the method indeed overrides properly. Even if the annotation is not specified, the behaviour remains the same.

In C#, the override keyword has a similar role – it tells the compiler that an overriding takes place. However, if the programmer does not specify the override keyword, the method can not be dynamically invoked from a base class reference! In other words, in the previous example if we had omitted the override keyword, the invocation of d.F() would call Base::F(), even though it is a virtual method and the actual instance type is Der.

In C# you can explicitly mark methods with the new keyword, to indicate that they are redefining, rather than overriding a base class method. Specifying new, is semantically the same as not specifying override (as in the previous paragraph). The new keyword just makes it clearer for the reader.


A huge difference

Java’s default dynamic binding behaviour can be implemented in C# by specifying all instance methods as virtual, and annotating all their redefinitions with override. The reverse is not possible. Java can’t implement static binding. The closest you can achieve is to define a method as final, which forbids subclasses from re-implementing it altogether.

This is a huge philosophical difference. In Java an object behaves identically, no matter what the type of the reference actually is. Conversely, in C# the behaviour of a single object may change depending on the declared type of the reference.

In Java, you can extend any class from any library and override any accessible method (unless explicitly forbidden with final). This sometimes proves invaluable, as it allows you to work-around bugs or unwanted behaviour in external code bases. In C# you can only override what the original developer has marked as virtual. This in turns allows you to be more specific about which parts of your code are extensible (i.e. can be overriden).

CloudSim and CloudSimEx [Part 3] – Delayed VM and Cloudlet actions

Introduction

Quite a few CloudSim users have asked on the mailing lists how to submit/destroy a VM or a cloudlet with a delay. Unfortunately, this is not straightforward in CloudSim, and users have to develop a custom broker and override several methods to achieve this. This is far from trivial, as it involves launching and handling custom events and ensuring the internal state of the broker is consistent – e.g. all cloudlets of a terminated VM are killed.

That’s why CloudSimEx introduced a new broker DatacenterBrokerEX, which among other new features also supports dynamic provisioning and scheduling of VMs and cloudlets.

Prerequisites

I assume you’ve already worked through Part 1 of this series. If not, now is a good time to check it out –  CloudSim and CloudSimEx [Part 1].

Some Code Please

To demonstrate how the delayed actions work, we modify CloudSimExample1, which simply creates a VM and schedules a cloudlet on it. Our modification starts the VM with a 2 seconds delay, and destroys it with a 500 secs delay. Also, we delay the cloudlet submission with 10 secs. The full code of the example can be found in the class DelayExample1. Below we will focus only on the usage of the functionalities.

First we need to use a broker of type DatacenterBrokerEX (or a subclass):

 DatacenterBrokerEX broker = new DatacenterBrokerEX("Broker", 1000);

Note that the new broker has an additional parameter called lifeLength. Standard CloudSim brokers are terminated whenever there are no more running cloudlets/jobs. If the simulated system becomes idle for a period of time (i.e. no cloudlets are run) the broker and the simulation will be terminated! To overcome this issues DatacenterBrokerEX introduces this new parameter called lifeLength, and ensures that the simulation and the broker are not terminated before lifeLength seconds have passed, even if there are no running cloudlets. In the previous code we want the broker to be alive for lifeLength=1000 secs, even if there is an idle period.

After creating the broker, we can go on to instantiate the VM and the clouldlet, as we would in a typical CloudSim program. The interesting part is the creation and destruction of VMs with a delay:

// submit vm to the broker after 2 seconds
broker.createVmsAfter(Arrays.asList(vm), 2);
// destroy VM after 500 seconds
broker.destroyVMsAfter(Arrays.asList(vm), 500);

The above code will submit the VM 2 seconds afterwards, and will terminate it 500 secs later. Analogously, the following code will submit the cloudlet with a delay of 10 secs:

broker.submitCloudletList(Arrays.asList(cloudlet), 10);

If we look at the standard output of CloudSim, we can verify that:

2.0: Broker: Trying to Create VM #0 in Datacenter_0
2.1: Broker: VM #0 has been created in Datacenter #2, Host #0
10.0: Broker: Sending cloudlet 0 to VM #0
410.0: Broker: Cloudlet 0 received
500.0: Broker: Trying to Destroy VM #0 in Datacenter_0
500.0: Broker: VM #0 has been destroyed in Datacenter #2

Moreover if we schedule the termination of the VM before the completion of the cloudlet, its status will be set appropriately to Cloudlet.FAILED_RESOURCE_UNAVAILABLE.

Use Cases

So how is this useful? Well, it allows us to easily define execution scenarios in advance before the simulation start. We can predefine that the workload (i.e. cloudlets) will occur at a given time to test an autostaling policy, or that VMs will fail at specific times to test fail over policies. And most importantly we can do this with just a few lines of code.

DatacenterBrokerEX and its subclasses have other useful features as well, so stay tuned for future posts!

Starting VM with custom image, security group and key-pair via JClouds

Introduction

Recently I needed to programatically start EC2 instances from a private AMI (VM Image) as a part of a new provisioning algorithm I was working on. I also wanted to specify my predefined security group and key-pair, so that the new VM is usable right away. Lastly, I wanted to implement it as EC2-independent as possible, so that I can include multiple clouds later on.

There are a few Multi-Cloud libraries out there, whose purpose is to provide just that – a cloud provider agnostic API for managing cloud resources. After struggling a bit with both Apache LibCloud and Apache JClouds I could finally implement this in JClouds.

JClouds Implementation

The easiest way to set up JClouds is by using it as a Maven dependency. The following method implements the provisioning:

    public static List<List<String>> launchInstances(
            String providerId,
            String userName,
            String password,
            String locationId,
            String imageId,
            String hardwareId,
            String securityGroupName,
            String keyPairName,
            String groupName,
            int numVMs,
            Properties imageOwnerIdFilter) {

    	// Get the Compute abstraction for the provider.
    	// Override the available VM images
        ComputeService compute = ContextBuilder.
        		newBuilder(providerId).
        		credentials(userName, password).
        		overrides(imageOwnerIdFilter).
        		buildView(ComputeServiceContext.class).getComputeService();

        // Create a template for the VM
        Template template = compute.
        		templateBuilder().
        		locationId(locationId).
        		imageId(imageId).
        		hardwareId(hardwareId).build();

        // Specify your own security group
        TemplateOptions options = template.getOptions();
        options.securityGroups(securityGroupName);

        // Specify your own keypair if the current provider allows for this
        try {
            Method keyPairMethod = options.getClass().getMethod("keyPair", String.class);
            keyPairMethod.invoke(options, keyPairName);
        } catch (NoSuchMethodException | SecurityException | IllegalAccessException | IllegalArgumentException
                | InvocationTargetException e) {
            throw new IllegalStateException("Provider: " + providerId + " does not support specifying key-pairs.", e);
        }

        final List<List<String>> launchedNodesAddresses = new ArrayList<>();
        try {
            // Launch the instances...
            Set<? extends NodeMetadata> launchedNodesMetadata = compute.createNodesInGroup(groupName, numVMs, template);

            // Collect the addresses ...
            for (NodeMetadata nodeMetadata : launchedNodesMetadata) {
                launchedNodesAddresses.add(new ArrayList<>(nodeMetadata.getPublicAddresses()));
            }
        } catch (RunNodesException e) {
            throw new IllegalStateException("Nodes could not be created.", e);
        }

        return launchedNodesAddresses;
    }

The input parameters of the method are:

  • providerId – a JClouds specific ID of the provider (AWS, RightScale  etc.);
  • userName – the user name for the provider;
  • password – the password or secret key;
  • locationId – a JClouds specific ID of the location of the cloud data centre site;
  • imageId – the ID of the VM Image or AMI in AWS;
  • hardwareId – the type of the VM (e.g. m1.small);
  • securityGroupName – the name of the predefined security group;
  • keyPairName – the name of the predefined key-pair;
  • groupName – a name pattern for the newly created VMs. Must be lower case;
  • numVMs – how many VMs you want to create at once. If 1 – a single VM is created;
  • imageOwnerIdFilter – by default some providers do not list private VM images. Thus you need to specify a custom filter/query that will make them list your private images.

In the next section we’ll see how all these parameters can be specified.

The above code is pretty self-evident and follows the standard JClouds templates. The first interesting point is that we need to override the list of available VM images (line 19) with a custom query, so that we can use our own private VM image. Secondly JClouds does not support specifying key-pairs for all cloud providers and hence the “keyPair” method is not present in any base class. To avoid using provider specific ComputeService implementations we dynamically inspect if the current provider supports key-pairs (lines 35-36).

As a result the method returns a list of  the addresses for each instantiated VM.

Running in AWS

The above method is generic and is not bound to AWS EC2. In order to run it on EC2 we need to specify the appropriate parameters as in the following code sample:

String providerId = "aws-ec2";
String accesskeyid = "...";
String secretkey = "...";
String imageOwnerId = "...";
String locationId = "ap-southeast-2a";
String imageId = "ap-southeast-2/ami-XXX";
String hardwareId = org.jclouds.ec2.domain.InstanceType.T1_MICRO;
String securityGroupName = "SecGroupName";
String keyPairName = "KeyPairName";
String groupName = "groupname"; // Must be lower case
int numVMs = 1;

Properties imageOwnerIdFilter = new Properties();
imageOwnerIdFilter.setProperty(
    "jclouds.ec2.ami-query", "owner-id=" +
    imageOwnerId +
    ";state=available;image-type=machine");

List<List<String>> launchedNodesAddresses = launchInstances(providerId,
    accesskeyid,
    secretkey,
    locationId,
    imageId,
    hardwareId,
    securityGroupName,
    keyPairName,
    groupName,
    numVMs,
    imageOwnerIdFilter);

System.out.println(launchedNodesAddresses);


Note that in the above code we use the AWS region as a part of the image ID (line 6). This is a requirement for EC2. Also we constructed an AWS specific image query with the image owner id as a parameter (line 14).


CloudSim and CloudSimEx [Part 2] – Disk operations

Introduction

In a previous post I introduced the CloudSimEx project featuring a set of CloudSim extensions and I discussed how to set it up in Eclipse and work with it.  In this post I’ll focus on how CloudSimEx enables disk operations modelling.

CloudSim and most other distributed system performance simulators only represent CPU instructions. In other words, each job/cloudlet is defined only by the number of CPU operations it requires. However, many applications are disk I/O bound, not CPU bound and they work intensively with database services or files on the local storage. In a previous publication we’ve  explained at a high level how disk operations can be simulated. In this post I’ll demonstrate how this works in practice with CloudSimEx.

Prerequisites

I assume you’ve already worked through Part 1 of this series. If not, now is a good time to check it out –  CloudSim and CloudSimEx [Part].

Model

In the core CloudSim every Host has a CPU with one or many cores, which are represented by the Pe class. The CPU instructions are distributed to a host’s VMs by a VmScheduler.  The most widely used scheduler is VmSchedulerTimeShared, which allocates one or more cores (i.e. Pe) to a VM, and allows sharing of PEs by multiple VMs. Each Vm has a predefined CPU requirements that the scheduler tries to honour when distributing the host’s CPU resources.

CPU cores and disks are similar concepts to model, since they both have some predefined capacity/throughput of operations they can perform during a given time interval (either CPU or disk I/O operations) which needs to be shared among the virtual machines. Thus in CloudSimEx we represent a disk with the class HddPe, which extends Pe. The difference between a CPU core (Pe) and a disk (HddPe) is that a disk has data items stored on it. A data items is a block of persistent storage used by an application – e.g. a file or a database shard.

We also introduce new types of hosts (HddHost) and virtual machines (HddVm) that accommodate disks. A HddHost can have one or more disks (i.e. HddPe). A HddVm has an additional property defining how many disk operations it requires from the hosts, similarly to the way each Vm has a number of CPU operations per second as a requirement. Also each HddVm has a list of attached disks. Thus a virtual machine can have access to all or a subset of the disks of its host. Each HddHost has a VmDiskScheduler which allocates the available throughput of its disks to the hosted virtual machines, similarly to the way a VmScheduler allocates CPU operations to VMs. In fact under the hood a VmDiskScheduler uses a dedicated VmScheduler to manage each disk.

The following diagram depicts the above concepts.

HddHost – uses VmScheduler and VmDiskScheduler to assign CPU and disk operations to its disk enable VMs (i.e. HddVm). Each disk has a set of disk items (e.g. files).


Once disk and CPU operations are distributed among the virtual machines, they in turn need to distribute them to their cloudlets/jobs. Thus CloudSimEx introduces a new type of cloudlet – HddCloudlet. In addition to the number of CPU instructions (mips) it also has a number of disk I/O operations (miops) and a data item. In CloudSim a standard cloudlet is complete/finished only if mips CPU instructions have been assigned to it by the virtual machine. In CloudSimEx a HddCloudlet is complete only if both mips CPU and miops disk operations have been provided by the VM. In other words a HddCloudlet is finished only when it has executed all of its both CPU and disk instructions.

To distribute disk and CPU operations, each HddVm uses a dedicated scheduler – HddCloudletSchedulerTimeShared. It distributes the CPU and disk operations in a time-shared manner (i.e. similar to CloudletSchedulerTimeShared). However, when assigning disk operations to a cloudlet, it only uses instructions from the disk which hosts its data item. If no such disk is accessible from the VM – the cloudlet fails. In other words if a cloudlet has a given data item (e.g. a file) the HddCloudletSchedulerTimeShared will only allocate operations from the disk which hosts it, if it is available to the VM. Otherwise the cloudlet will fail.

The following diagram depicts the above concepts:

HddVm: A HddCloudletSchedulerTimeShared isntance allocates CPU & disk resources to cloudlets. Each cloudlet is associated to a data item and requries a number of I/O operations.


Some Code Please

The samples below are extracted from CloudSimDisksExample. The code excerpts below assume you have defined all capital letter constants like HOST_MIPS, HOST_MIOPS etc. You can look at CloudSimDisksExample to see how these can be defined.

Lets start by creating a few data items, which later on we’ll position on two disks:

// These two items will reside on the first disk
DataItem dataItem_1_1 = new DataItem(DATA_ITEM_SIZE);
DataItem dataItem_1_2 = new DataItem(DATA_ITEM_SIZE);

// These two items will reside on the second disk
DataItem dataItem_2_1 = new DataItem(DATA_ITEM_SIZE);
DataItem dataItem_2_2 = new DataItem(DATA_ITEM_SIZE);

Next we can create lists of CPUs and disks – i.e. Pe and HddPe. Disks are associated with data items in the constructor:

List<Pe> peList = Arrays.asList(new Pe(Id.pollId(Pe.class), new PeProvisionerSimple(HOST_MIPS)));

HddPe disk1 = new HddPe(new PeProvisionerSimple(HOST_MIOPS), dataItem_1_1, dataItem_1_2);
HddPe disk2 = new HddPe(new PeProvisionerSimple(HOST_MIOPS), dataItem_2_1, dataItem_2_2);
List<HddPe> hddList = Arrays.asList(disk1, disk2);

Next we can create a host with these CPUs and disks:

HddHost host = new HddHost(new RamProvisionerSimple(HOST_RAM),
    new BwProvisionerSimple(HOST_BW),
    HOST_STORAGE,
    peList,
    hddList,
    new VmSchedulerTimeShared(peList),
    new VmDiskScheduler(hddList));

After that you can create a data centre with this host and a broker. This is standard CloudSim stuff. The only difference is that you need to use HddDataCenter instead of just DataCenter:

// Build the data centre and a broker
List<? extends Host> hostList = Arrays.asList(host);
DatacenterCharacteristics characteristics = new DatacenterCharacteristics(ARCH,
    OS,
    VMM,
    hostList,
    TIME_ZONE,
    COST,
    COST_PER_MEM,
    COST_PER_STORAGE,
    COST_PER_BW);

List<Storage> storageList = new ArrayList<>();
HddDataCenter datacenter = new HddDataCenter("DC",
    characteristics,
    new VmAllocationPolicySimple(hostList),
    storageList, 0);

DatacenterBroker broker = new DatacenterBroker("Broker");

Now we’ll create a VM which has access to only one of the disks and submit to the broker:

Vm vm1 = new HddVm("TestVM",
    broker.getId(),
    VM_MIPS,
    HOST_MIOPS,
    1,
    VM_RAM,
    VM_BW,
    VM_SIZE,
    VMM,
    new HddCloudletSchedulerTimeShared(),
    new Integer[] { disk1.getId() });

broker.submitVmList(Arrays.asList(vm1));

Now finally we can run some cloudlets:

// Create cloudlets accessing data items on disk 1 and disk 2 respectively
HddCloudlet cloudlet1_1 = new HddCloudlet(VM_MIPS * 1, HOST_MIOPS * 2, 5, broker.getId(), false, dataItem_1_1);
HddCloudlet cloudlet2_1 = new HddCloudlet(VM_MIPS * 1, HOST_MIOPS * 2, 5, broker.getId(), false, dataItem_2_2);

// Associate them with the VM

// cloudlet1_1 will execute, as vm1 has access to disk1 and dataItem_1_1
cloudlet1_1.setVmId(vm1.getId());
// cloudlet2_2 will fail, as vm1 has no access to disk2 and dataItem_2_2
cloudlet2_2.setVmId(vm1.getId());

// Submit...
broker.submitCloudletList(Arrays.asList(cloudlet1_1, cloudlet2_2));

Relation to CloudSim storage

The core CloudSim code already defines some storage related attributes. They are not related to the above functionalities!

For example each data centre can have a List<Storage> property. Storages like SAN storage are supported in CloudSim. However, you can not use these CloudSim entities to represent contention when accessing persistent data either at the VM or cloudlet/job level.

Extensibility

CloudSimEx comes with default implementations of the scheduling policies. However, you can implement your own VmDiskScheduler and HddCloudletScheduler extensions, which distribute CPU and disk operations with respect to your application’s requirements.


References


CloudSim and CloudSimEx [Part 1]

Introduction

CloudSim is one of the most popular Cloud infrastructure simulators and is used throughout academia and industry. Being one of its maintainers I often get emails with requests for new features. I also get quite a few emails about several CloudSim extensions that we published a paper about (pdf) last year. Thus I’ve started  the CloudSimEx project, which brings some of these extensions together and in a series of posts I’ll demo some of its functionalities.

So what is CloudSimEx? CloudSimEx is a set of CloudSim extensions making simulation development easier and enabling the modelling of new types of applications, not supported by CloudSim. Currently the following features are included:

  • Web session modelling;
  • Better logging utilities;
  • Utilities for generating CSV files for statistical analysis;
  • Automatic id generation;
  • Modelling of disk operations;
  • Utilities for running multiple experiments in parallel;
  • Utilities for modelling network latencies;
  • MapReduce simulation.

In this part I’ll explain how to set up CloudSim and CloudSimEx in Eclipse and how to use some of its base utility functionalities.

Prerequisites

Before following this tutorial you should have JDK 7 and Maven 3.2 or later installed on your system. CloudSim currently can not be built with Java 8, because of some issues in the integration of Java 8 and Maven. Edit: Both CloudSim and CloudSimEx now compile with Java 7 and 8 as well.

Installation instructions for Java 7 and Maven can be found here:

You should also have installed Eclipse IDE Java EE Developers and SVN and GIT clients. If you’re unfamiliar with CloudSim itself, you can look at these examples.

CloudSim SetUp

As a first step we need to get CloudSim’s code and build it. Navigate to a folder of choice and issue the following commands:

git clone https://github.com/Cloudslab/cloudsim.git
cd cloudsim
mvn clean install

This should take some time and in the end you should see the resounding “BUILD SUCCESSFUL”.

Before we open CloudSim in Eclipse, we need make a few settings in the IDE. By default Eclipse comes with an embedded installation of Maven, which is different that the one on the operating system. We need to tell Eclipse to use the already installed one. Otherwise building from the IDE and the terminal will be two different things. You can skip the next step if you have already done this. If not go to Window -> Preferences -> Maven -> Installations and add the location of your maven installation:

MavenInEclipseNow we can import the CloudSim project into Eclipse. Go to File -> Import -> Existing Maven Projects and follow the wizard. You can use the following screenshots as a guideline:

This should open the CloudSim projects in Eclipse.

CloudSimEx SetUp

After CloudSim is set, we can continue to set up CloudSimEx as well. The following commands do just that.

git clone https://github.com/Cloudslab/CloudSimEx.git
cd CloudSimEx
mvn clean install

Again, if all is fine you should see “BUILD SUCCESSFUL” int your terminal. Next you can open the CloudSimEx projects in Eclipse. Again you need to go to File -> Import -> Existing Maven Projects and follow the wizard, as we did with CloudSim.

Test Project

Now that CloudSim and CloudSimEx are set up we can create a simple test project, in which we can experiment with them. Go to File -> New -> Project… -> Maven Project and follow the wizard to create a simple maven project. You can use the following screeshots as a guideline:

After the project is created, open its pom.xml file and add the following dependencies inside the <project> section:

<dependencies>
    <dependency>
        <groupId>org.cloudbus.cloudsim</groupId>
        <artifactId>cloudsim</artifactId>
        <version>3.1-SNAPSHOT</version>
    </dependency>
    <dependency>
        <groupId>org.cloudbus</groupId>
        <artifactId>cloudsimex-core</artifactId>
        <version>1.0-SNAPSHOT</version>
    </dependency>
    <dependency>
        <groupId>org.cloudbus</groupId>
        <artifactId>cloudsimex-geolocation</artifactId>
        <version>1.0-SNAPSHOT</version>
    </dependency>
    <dependency>
        <groupId>org.cloudbus</groupId>
        <artifactId>cloudsimex-web</artifactId>
        <version>1.0-SNAPSHOT</version>
    </dependency>
    <dependency>
        <groupId>org.cloudbus</groupId>
        <artifactId>cloudsimex-mapreduce</artifactId>
        <version>1.0-SNAPSHOT</version>
    </dependency>
</dependencies>

Finally, you should make sure the Eclipse project is configured to use Java 7. Rigth click on the test project in the explorer, select Properties, and ensure that the Java compiler compliance level is set to 1.7, as in the following screenshot:

Test-Project-Properties

Now you can create a class with a main method in the new project and it can import all CloudSim and CloudSimEx classes. You’re ready to go!

ID generation

CloudSim requires the end user to provide a lot of numerical ids for the simulation entities (e.g. cloudlets, VMs). This tends to be error prone. If you provide duplicate ids for entities of the same type (e.g. cloudlets) this will result in an insidious bug, as CloudSim won’t give any warning. Moreover in complex simulations virtual machines and cloudlets (i.e. jobs) need to be created dynamically, and thus you’ll need to maintain global counters for id generation.

To solve the problem I’ve created the simple utility class org.cloudbus.cloudsim.ex.util.Id. It allows you to create unique ids per simulation entity type. For example the following code creates three cloudlets with unique ids:

Cloudlet cl1 = new Cloudlet(Id.pollId(Cloudlet.class), ... );
Cloudlet cl2 = new NetworkCloudlet(Id.pollId(NetworkCloudlet.class), ... );
Cloudlet cl3 = new NetworkCloudlet(Id.pollId(Cloudlet.class), ... );

System.out.println(cl1.getCloudletId());   // Prints 1
System.out.println(cl2.getCloudletId());   // Prints 2
System.out.println(cl3.getCloudletId());   // Prints 3

Note that the exact type that you pass to Id.pollId( ) does not matter, as long as it is a subtype of a CloudSim entity – e.g. cloudlet, VM or host. The implementation will automatically check if the type you pass is a cloudlet or something else and will return an appropriate id. For example In the above code it didn’t matter if we call Id.pollId(Cloudlet.class) or Id.pollId(NetworkCloudlet.class), it would return a unique cloudlet id in all cases.

If you’re developing classes that extend CloudSim entities, you can eliminate the need for ids altogether, by redefining their constructors. For example, the following code creates a custom cloudlet, that automatically creates its own id in the costructor, and its users won’t need to bother with ids.

public class MyCloudlet extends Cloudlet {
    public MyCloudlet(...) {
        super(Id.pollId(getClass()), ...);
    }
}

In fact, this is the approach taken in all CloudSimEx classes. Thus in CloudSimEx you don’t need to specify your own ids.

CSV export of objects

When developing CloudSim simulations people often need to export tabular (i.e. coma separated values or CSV) for further statistical analysis. For example you may want to export data about your jobs’/cloudlets’ start, end and execution time in a CSV file, in order to compute statistics or perform numerical analysis with Excel, R, SAS or Matlab. Looping over all objects and their properties, taking care of column padding and so on can be a drag.

Enter the TextUtil class. Converting an object to a CSV line is now just a single line of code. Add another line and you’ve got yourself a header, as in this example:

Vm vm = new Vm(Id.pollId(Vm.class), .....);
// getCaptionLine - prints a header
System.out.println(TextUtil.getCaptionLine(Vm.class));
// getTxtLine - prints a CSV line
System.out.println(TextUtil.getTxtLine(vm));

By default TextUtil inspects all the properties (i.e. public no-arg get methods) of the class/object and concatenates them taking into account predefined formatting and padding options. You can modify the list and order of properties for a given class using the Textualize annotation. The output of the above is:

BeingInstantiated;     Bw;CloudletScheduler;CurrentAllocatedBw;CurrentAllocatedMips;CurrentAllocatedRam;CurrentAllocatedSize;CurrentRequestedBw;CurrentRequestedMaxMips;CurrentRequestedMips;CurrentRequestedRam;CurrentRequestedTotalMips;Host;     Id;InMigration;      Mips;NumberOfPes;    Ram;   Size;StateHistory;                 Uid; UserId;                 Vmm;Class
             true;   1000;   ref&amp;lt;455659002&amp;gt;;                 0;                null;                  0;                   0;              1000;                1000.00;               [...];                512;                  1000.00;null;      4;      false;   1000.00;          1;    512;  10000;       [...];                 0-4;      0;                 Xen;   Vm

TextUtil automatically converts references, arrays and collections to simple representations, so that the CSV line format is maintained.

Often you don’t need all properties of an object in the CSV – you may only need 2 or 3 of them. Again this can be done with a single line of code. You just need to specify the names of the properties when invoking TextUtil:

Vm vm = new Vm(Id.pollId(Vm.class), .....);
String[] props = new String[] { &amp;quot;Bw&amp;quot;, &amp;quot;CurrentRequestedRam&amp;quot; };
System.out.println(TextUtil.getCaptionLine(Vm.class, props));
System.out.println(TextUtil.getTxtLine(vm, props));

This code will only print the  “Bw” and  “CurrentRequestedRam” properties, defined by the getBw and getCurrentRequestedRam methods:

     Bw;CurrentRequestedRam
   1000;                512

In all above examples, we used the default delimeter “;”. All TextUtil methods are overloaded so that you can specify another delimiter if needed.

Finally, often you may need some derived characteristic/column in the CSV. For example, you may like to have a field in gigabytes instead of megabytes, or you may want to compute the difference between two fields in a new column. TextUtil allows you to define the so-called virtual properties. A virtual property is just a pair – a name and Function (from the guava library) which defines its value. The following example shows how to define an additional virtual property “CurrentRequestedRamGB” and to print it in conjunction with the regular property “CurrentRequestedRam”:

Vm vm = new Vm(Id.pollId(Vm.class), ...);

String[] props = new String[] { &amp;quot;CurrentRequestedRam&amp;quot; };

LinkedHashMap&amp;lt;String, Function&amp;lt;? extends Vm, String&amp;gt;&amp;gt; virtualProps = new LinkedHashMap&amp;lt;&amp;gt;();
virtualProps.put(&amp;quot;CurrentRequestedRamGB&amp;quot;, new Function&amp;lt;Vm, String&amp;gt;() {
   @Override public String apply(Vm v) {
     return String.valueOf(v.getCurrentRequestedRam() / 1024.0);
   }
});

System.out.println(TextUtil.getCaptionLine(Vm.class, props, virtualProps.keySet()));
System.out.println(TextUtil.getTxtLine(vm, props, virtualProps));

This prints:

CurrentRequestedRam;CurrentRequestedRamGB
                512;                  0.5

Custom Logging

CloudSim’s default Log implementation is designed only to print to the standard output. Hence CloudSimEx introduces a new logger called CustomLog. It follows the same design principle of the original Log, but has several new functionalities. It allows (i) output  redirection to a file, (ii) flexible definition of log entry formats. Most importantly it plays well with TextUtil and can be used to easily create CSV files for analysis.

To begin with, you need to configure the logger with a set of properties. You would typically store them in a separate configuration file:


Properties props = new Properties();
try (InputStream is = Files.newInputStream(Paths.get(&amp;quot;...your file...&amp;quot;))) {
    props.load(is);
}
CustomLog.configLogger(props);

The important properties are:

  • FilePath – if present this property has the value of the target log file. If this property is not present, the log is written to the standard output.
  • LogLevel – each log message has a level. This property identifies the minimal log level that will be printed. Levels are as in standard java logging – see LogLevel. If this property is not present, a default log level INFO is used.
  • LogCloudSimClock – a boolean proeprty. If “true” the current CloudSim simulation time will be included in every log entry.
  • LogReadableSimClock – a boolean property. If “true” the current CloudSim simulation time will be included in every log entry and it will be formatted in the “days:hours:minutes:seconds” format.
  • LogRealTimeClock – a boolean property. If “true” the actual system/computer time will be included in every log entry.
  • LogFormat – a list of get method names of the class LogRecord. It allows you to specify what should compose your log entries. Typically you would specify just “getMessage” or “getLevel;getMessage“.
  • ShutStandardLogger – a boolean property. If “true” it will shut CloudSim’s standard logger. This is useful, when the standard logger generates too many log messages and causes the simulation execution to slow down significantly.

Consider the following example:


FilePath=/mydesktop/log.log
LogLevel=INFO
LogCloudSimClock=true
LogReadableSimClock=false
LogRealTimeClock=true
LogFormat=getMessage
ShutStandardLogger=true

Given this configuration, CustomLog will output only log entries with level higher than INFO, will print the current time, and the current CloudSim simulation time and will shut the standard CloudSim logger. The output will be written to the file /mydesktop/log.log. Thus if you call:

CustomLog.printf(&amp;quot;Hello %s&amp;quot;, &amp;quot;World&amp;quot;);

the output in the file will be something like this.

22:42:51          0.00    Hello World

If all you want to see is the message and not the current time, you need to switch LogCloudSimClock and LogRealTimeClock to “false”.

At any point during the simulation you can redirect CustomLog to another file or the standard output, by simply calling one of the following:


// Redirects to stdout ...
CustomLog.redirectToConsole();

// Redirects to a file, overwrites it
CustomLog.redirectToFile(&amp;quot;...your file...&amp;quot;);

// Redirects to a file, appends to it
CustomLog.redirectToFile(&amp;quot;...your file...&amp;quot;, true);

CustomLog has a lot of convenient methods for printing and formatting log messages and you can explore to see what’s there. As I mentioned it can use TextUtil to print well formatted CSV files. So if you have a list of objects (e.g. cloudlets or VMs) you can convert them to a CSV with a single line of  code, by using the printResults method. The following example demonstrates this:


List&amp;lt;Vm&amp;gt; vms = ......

CustomLog.redirectToFile(&amp;quot;... your CSV file ...&amp;quot;);
CustomLog.printResults(Vm.class, vms);

The printResults method is overloaded, so it can take property names and virtual properties, analogously to TextUtil.

Conclusion

In this article we just scratched the surface, by introducing CloudSimEx, explaining how to install it and overviewing some of its basic functionalities. In subsequent articles I’ll talk about how CloudSimEx allows for I/O operations simulation, web session modelling, running multiple experiments in parallel and utilities for modelling Internet latencies … so stay tuned 🙂

References

Java 8 in a Nutshell

Introduction & Installation

Oracle has officially released JDK 8, featuring long-awaited language features like lambdas and a new Date-Time API. This posts gives a brief overview of the new functional programming features in Java.

The latest JDK 8 can be downloaded and installed from Oracle’s website, or if you are running Ubuntu you can use an additional PPA repository as follows:

sudo su -
echo "deb http://ppa.launchpad.net/webupd8team/java/ubuntu trusty main" | tee /etc/apt/sources.list.d/webupd8team-java.list
echo "deb-src http://ppa.launchpad.net/webupd8team/java/ubuntu trusty main" | tee -a /etc/apt/sources.list.d/webupd8team-java.list
apt-key adv --keyserver keyserver.ubuntu.com --recv-keys EEA14886
exit

sudo apt-get update
sudo apt-get install oracle-java8-installer
sudo update-java-alternatives -s java-8-oracle
sudo apt-get install oracle-java8-set-default

Enhanced interfaces

A major problem of Java interfaces is extensibility. If you change an interface, all implementing classes must change as well. If this interface is a part of a public library for example, thousands of implementations (some of which in external code bases) may have to change. As of Java 8, interfaces can have default methods. Unlike standard abstract methods, a default method has an implementation and underlying classes do not need to implement it. Hence default methods can be added later on, without having to modify or recompile existing classes.

Another change in Java 8 is that interfaces can have static methods just like classes. The following example illustrates these features:

@FunctionalInterface // Will cause a complication error if a second abstract method is added
public interface Student {
    // Abstract method - all non-abstract subclasses need to implement it
    double getGPAGrade();

    // Static method
    static double getMaxGPAGrade() {
        return 7;
    }

    // Default method - no need to implement. Subclasses can still decide to override it.
    default double getPercentageGrade() {
        return (getGPAGrade() / getMaxGPAGrade()) * 100;
    }
}

An interface with a single abstract method (i.e. which is not static or default) is called a functional interface, since it is essentially an abstract definition of a function. Standard examples are Runnable, Callable, ActionListener and Comparator. The new package java.util.function introduces more standard functional interfaces like Predicate, Function and Consumer.

Java 8 introduces an informative annotation @FunctionalInterface which can be used to annotate interfaces. If an annotated interface is not a functional interface a compilation error is raised.

Lambdas

Lambdas are not a new concept and should be straightforward to understand for anyone exposed to some sort of functional programming. If you have no experience with programming languages with functional features, you can think of lambda expressions as a syntax shorthand for anonymous subclasses of functional interfaces. The syntax for a lambda expression is:

(param1, param2, ... , paramN) -> expression | block of code

If the parameter list has only one parameter the brackets can be omitted. Note that there are no types in the lambda definitions, as types are automatically inferred from the functional interface definition. Types can be defined explicitly, but this is not required. The body of the lambda expressions can be either a single expression (whose evaluation is the result of the function call) or a block of code, similar to a method definition.

The following examples demonstrate functionally equivalent definitions:

Student s1 = () -> 3;               // Expression body
Student s2 = () -> {return 3;};     // Block of code body
Student s3 = new Student() {        // Java 7 style
    public double getGPAGrade() {
        return 3;
    }
};
Comparator<Integer> cmp1 = (x, y) -> x.compareTo(y);   // Expression body. Types NOT specified
Comparator<Integer> cmp2 = (Integer x, Integer y) -> { // Block of code body. Types specified
    return x.compareTo(y);
};
Comparator<Integer> cmp3 = new Comparator<Integer>() { // Java 7 style
    public int compare(Integer x, Integer y) {
        return x.compareTo(y);
    }
};
Runnable r1 = () -> System.out.println("Test");         // Expression body
Runnable r2 = () -> { System.out.println("Test"); };    // Block of code body
Runnable r3 = new Runnable() {                          // Java 7 style
    public void run() {
        System.out.println("Test");
    }
};

Method References

Lambdas are a neat way to implement functional interfaces, but often all they do is call an existing method. To make things simpler Java 8 introduces method references. Method references are a shorthand for implementing functional interfaces by calling already defined methods.

There are four types of method references:

Reference to Syntax Lambda Equivalent
Static method Class::staticMethod (param1, … paramN) -> Class.staticMethod(param1, … paramN)
Specific instance’s method var::instanceMethod (param1, … paramN) -> var.instanceMethod(param1, … paramN)
Instance method Class::instanceMethod (var, param1, … paramN) -> var.instanceMethod(param1, … paramN)
Constructor Class::new (param1, … paramN) -> new Class(param1, … paramN)

The following examples demonstrate equivalent definitions with method references and lambdas:

    Predicate<String> p1 = Boolean::getBoolean;         // Static method reference
    Predicate<String> p2 = s -> Boolean.getBoolean(s);  // Equivalent lambda
    String var = "TestEquality";
    Predicate<String> p1 = var::equals;         // Specific instance's method reference
    Predicate<String> p2 = s -> var.equals(s);  // Equivalent lambda
    Predicate<String> p1 = String::isEmpty;     // Instance method reference
    Predicate<String> p2 = s -> s.isEmpty();    // Equivalent lambda
    Predicate<String> p1 = Boolean::new;           // Constructor reference
    Predicate<String> p2 = s -> new Boolean(s);    // Equivalent lambda

Streams

So far we’ve seen that Java 8 has removed some of the clutter around implementing functional interfaces. Functional interfaces are especially useful for manipulating collections, and thus Java 8 introduces the java.util.stream package. The main interface in this package is Stream, which represents a sequence of elements supporting performing a sequence of actions – e.g. filtering, mapping, aggregation etc. Each of these standard stream methods takes as a parameter an instance of a functional interface.

Each standard collection in Java 8 can be converted to a stream through the stream() and parallelStream() methods. The difference between them, is that if possible parallelStream() returns a Stream instance, whose operations can be parallelised. Streams can also be converted to collections by the collect() method.

The main functionalities/methods of Stream are:

  • filter – given a predicate creates a new stream, whose elements match the predicate;
  • map – given a function f, creates a new stream, whose elements are the result of applying the function over this stream’s element;
  • reduce – aggregates the stream elements into a single value by consecutively applying a provided binary function. The result is wrapped in an Optional instance;
  • forEach/forEachOrdered – executes a Consumer instance’s method for every element of the stream. The Consumer functional interface represents an arbitrary block of code.

The following example demonstrates how lambdas and method references allow standard collection processing operations to be written in a single line, rather than using series of loops as in Java 7.

List<Integer> numbers = Arrays.asList(1, 7, 15, 51, 16, 8);

// Filter all even numbers, then convert the stream to a list
List<Integer> evens = numbers.stream().filter(x -> x % 2 == 0).collect(Collectors.toList());

// Find the max even number
int maxEven = numbers.stream().filter(x -> x % 2 == 0).max(Integer::compare).get();

// Compute the sum of the squares of all even numbers in the list
int sumSquaresEven =
   numbers.stream().filter(x -> x % 2 == 0).map(x -> x * x).reduce(Integer::sum).get();

// Print all elements on a new line
numbers.stream().forEachOrdered(x -> System.out.println(x));

References