Introduction
CloudSim is one of the most popular Cloud infrastructure simulators and is used throughout academia and industry. Being one of its maintainers I often get emails with requests for new features. I also get quite a few emails about several CloudSim extensions that we published a paper about (pdf) last year. Thus I’ve started the CloudSimEx project, which brings some of these extensions together and in a series of posts I’ll demo some of its functionalities.
So what is CloudSimEx? CloudSimEx is a set of CloudSim extensions making simulation development easier and enabling the modelling of new types of applications, not supported by CloudSim. Currently the following features are included:
- Web session modelling;
- Better logging utilities;
- Utilities for generating CSV files for statistical analysis;
- Automatic id generation;
- Modelling of disk operations;
- Utilities for running multiple experiments in parallel;
- Utilities for modelling network latencies;
- MapReduce simulation.
In this part I’ll explain how to set up CloudSim and CloudSimEx in Eclipse and how to use some of its base utility functionalities.
Prerequisites
Before following this tutorial you should have JDK 7 and Maven 3.2 or later installed on your system. CloudSim currently can not be built with Java 8, because of some issues in the integration of Java 8 and Maven. Edit: Both CloudSim and CloudSimEx now compile with Java 7 and 8 as well.
Installation instructions for Java 7 and Maven can be found here:
You should also have installed Eclipse IDE Java EE Developers and SVN and GIT clients. If you’re unfamiliar with CloudSim itself, you can look at these examples.
CloudSim SetUp
As a first step we need to get CloudSim’s code and build it. Navigate to a folder of choice and issue the following commands:
git clone https://github.com/Cloudslab/cloudsim.git
cd cloudsim
mvn clean install
This should take some time and in the end you should see the resounding “BUILD SUCCESSFUL”.
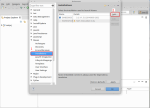
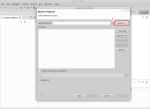
Before we open CloudSim in Eclipse, we need make a few settings in the IDE. By default Eclipse comes with an embedded installation of Maven, which is different that the one on the operating system. We need to tell Eclipse to use the already installed one. Otherwise building from the IDE and the terminal will be two different things. You can skip the next step if you have already done this. If not go to Window -> Preferences -> Maven -> Installations and add the location of your maven installation:
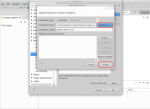
 Now we can import the CloudSim project into Eclipse. Go to File -> Import -> Existing Maven Projects and follow the wizard. You can use the following screenshots as a guideline:
This should open the CloudSim projects in Eclipse.
CloudSimEx SetUp
After CloudSim is set, we can continue to set up CloudSimEx as well. The following commands do just that.
git clone https://github.com/Cloudslab/CloudSimEx.git
cd CloudSimEx
mvn clean install
Again, if all is fine you should see “BUILD SUCCESSFUL” int your terminal. Next you can open the CloudSimEx projects in Eclipse. Again you need to go to File -> Import -> Existing Maven Projects and follow the wizard, as we did with CloudSim.
Test Project
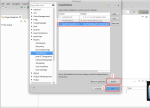
Now that CloudSim and CloudSimEx are set up we can create a simple test project, in which we can experiment with them. Go to File -> New -> Project… -> Maven Project and follow the wizard to create a simple maven project. You can use the following screeshots as a guideline:
After the project is created, open its pom.xml file and add the following dependencies inside the <project> section:
<dependencies>
    <dependency>
        <groupId>org.cloudbus.cloudsim</groupId>
        <artifactId>cloudsim</artifactId>
        <version>3.1-SNAPSHOT</version>
    </dependency>
    <dependency>
        <groupId>org.cloudbus</groupId>
        <artifactId>cloudsimex-core</artifactId>
        <version>1.0-SNAPSHOT</version>
    </dependency>
    <dependency>
        <groupId>org.cloudbus</groupId>
        <artifactId>cloudsimex-geolocation</artifactId>
        <version>1.0-SNAPSHOT</version>
    </dependency>
    <dependency>
        <groupId>org.cloudbus</groupId>
        <artifactId>cloudsimex-web</artifactId>
        <version>1.0-SNAPSHOT</version>
    </dependency>
    <dependency>
        <groupId>org.cloudbus</groupId>
        <artifactId>cloudsimex-mapreduce</artifactId>
        <version>1.0-SNAPSHOT</version>
    </dependency>
</dependencies>
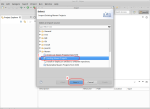
Finally, you should make sure the Eclipse project is configured to use Java 7. Rigth click on the test project in the explorer, select Properties, and ensure that the Java compiler compliance level is set to 1.7, as in the following screenshot:

Now you can create a class with a main method in the new project and it can import all CloudSim and CloudSimEx classes. You’re ready to go!
ID generation
CloudSim requires the end user to provide a lot of numerical ids for the simulation entities (e.g. cloudlets, VMs). This tends to be error prone. If you provide duplicate ids for entities of the same type (e.g. cloudlets) this will result in an insidious bug, as CloudSim won’t give any warning. Moreover in complex simulations virtual machines and cloudlets (i.e. jobs) need to be created dynamically, and thus you’ll need to maintain global counters for id generation.
To solve the problem I’ve created the simple utility class org.cloudbus.cloudsim.ex.util.Id. It allows you to create unique ids per simulation entity type. For example the following code creates three cloudlets with unique ids:
Cloudlet cl1 = new Cloudlet(Id.pollId(Cloudlet.class), ... );
Cloudlet cl2 = new NetworkCloudlet(Id.pollId(NetworkCloudlet.class), ... );
Cloudlet cl3 = new NetworkCloudlet(Id.pollId(Cloudlet.class), ... );

System.out.println(cl1.getCloudletId());   // Prints 1
System.out.println(cl2.getCloudletId());   // Prints 2
System.out.println(cl3.getCloudletId());   // Prints 3
Note that the exact type that you pass to Id.pollId( ) does not matter, as long as it is a subtype of a CloudSim entity – e.g. cloudlet, VM or host. The implementation will automatically check if the type you pass is a cloudlet or something else and will return an appropriate id. For example In the above code it didn’t matter if we call Id.pollId(Cloudlet.class) or Id.pollId(NetworkCloudlet.class), it would return a unique cloudlet id in all cases.
If you’re developing classes that extend CloudSim entities, you can eliminate the need for ids altogether, by redefining their constructors. For example, the following code creates a custom cloudlet, that automatically creates its own id in the costructor, and its users won’t need to bother with ids.
public class MyCloudlet extends Cloudlet {
    public MyCloudlet(...) {
        super(Id.pollId(getClass()), ...);
    }
}
In fact, this is the approach taken in all CloudSimEx classes. Thus in CloudSimEx you don’t need to specify your own ids.
CSV export of objects
When developing CloudSim simulations people often need to export tabular (i.e. coma separated values or CSV) for further statistical analysis. For example you may want to export data about your jobs’/cloudlets’ start, end and execution time in a CSV file, in order to compute statistics or perform numerical analysis with Excel, R, SAS or Matlab. Looping over all objects and their properties, taking care of column padding and so on can be a drag.
Enter the TextUtil class. Converting an object to a CSV line is now just a single line of code. Add another line and you’ve got yourself a header, as in this example:
Vm vm = new Vm(Id.pollId(Vm.class), .....);
// getCaptionLine - prints a header
System.out.println(TextUtil.getCaptionLine(Vm.class));
// getTxtLine - prints a CSV line
System.out.println(TextUtil.getTxtLine(vm));
By default TextUtil inspects all the properties (i.e. public no-arg get methods) of the class/object and concatenates them taking into account predefined formatting and padding options. You can modify the list and order of properties for a given class using the Textualize annotation. The output of the above is:
BeingInstantiated; Bw;CloudletScheduler;CurrentAllocatedBw;CurrentAllocatedMips;CurrentAllocatedRam;CurrentAllocatedSize;CurrentRequestedBw;CurrentRequestedMaxMips;CurrentRequestedMips;CurrentRequestedRam;CurrentRequestedTotalMips;Host; Id;InMigration; Mips;NumberOfPes; Ram; Size;StateHistory; Uid; UserId; Vmm;Class
true; 1000; ref&lt;455659002&gt;; 0; null; 0; 0; 1000; 1000.00; [...]; 512; 1000.00;null; 4; false; 1000.00; 1; 512; 10000; [...]; 0-4; 0; Xen; Vm
TextUtil automatically converts references, arrays and collections to simple representations, so that the CSV line format is maintained.
Often you don’t need all properties of an object in the CSV – you may only need 2 or 3 of them. Again this can be done with a single line of code. You just need to specify the names of the properties when invoking TextUtil:
Vm vm = new Vm(Id.pollId(Vm.class), .....);
String[] props = new String[] { &quot;Bw&quot;, &quot;CurrentRequestedRam&quot; };
System.out.println(TextUtil.getCaptionLine(Vm.class, props));
System.out.println(TextUtil.getTxtLine(vm, props));
This code will only print the “Bw” and “CurrentRequestedRam” properties, defined by the getBw and getCurrentRequestedRam methods:
     Bw;CurrentRequestedRam
   1000;                512
In all above examples, we used the default delimeter “;”. All TextUtil methods are overloaded so that you can specify another delimiter if needed.
Finally, often you may need some derived characteristic/column in the CSV. For example, you may like to have a field in gigabytes instead of megabytes, or you may want to compute the difference between two fields in a new column. TextUtil allows you to define the so-called virtual properties. A virtual property is just a pair – a name and Function (from the guava library) which defines its value. The following example shows how to define an additional virtual property “CurrentRequestedRamGB” and to print it in conjunction with the regular property “CurrentRequestedRam”:
Vm vm = new Vm(Id.pollId(Vm.class), ...);
String[] props = new String[] { &quot;CurrentRequestedRam&quot; };
LinkedHashMap&lt;String, Function&lt;? extends Vm, String&gt;&gt; virtualProps = new LinkedHashMap&lt;&gt;();
virtualProps.put(&quot;CurrentRequestedRamGB&quot;, new Function&lt;Vm, String&gt;() {
@Override public String apply(Vm v) {
return String.valueOf(v.getCurrentRequestedRam() / 1024.0);
}
});
System.out.println(TextUtil.getCaptionLine(Vm.class, props, virtualProps.keySet()));
System.out.println(TextUtil.getTxtLine(vm, props, virtualProps));
This prints:
CurrentRequestedRam;CurrentRequestedRamGB
                512;                  0.5
Custom Logging
CloudSim’s default Log implementation is designed only to print to the standard output. Hence CloudSimEx introduces a new logger called CustomLog. It follows the same design principle of the original Log, but has several new functionalities. It allows (i) output redirection to a file, (ii) flexible definition of log entry formats. Most importantly it plays well with TextUtil and can be used to easily create CSV files for analysis.
To begin with, you need to configure the logger with a set of properties. You would typically store them in a separate configuration file:
Properties props = new Properties();
try (InputStream is = Files.newInputStream(Paths.get(&quot;...your file...&quot;))) {
props.load(is);
}
CustomLog.configLogger(props);
The important properties are:
- FilePath – if present this property has the value of the target log file. If this property is not present, the log is written to the standard output.
- LogLevel – each log message has a level. This property identifies the minimal log level that will be printed. Levels are as in standard java logging – see LogLevel. If this property is not present, a default log level INFO is used.
- LogCloudSimClock – a boolean proeprty. If “true” the current CloudSim simulation time will be included in every log entry.
- LogReadableSimClock – a boolean property. If “true” the current CloudSim simulation time will be included in every log entry and it will be formatted in the “days:hours:minutes:seconds” format.
- LogRealTimeClock – a boolean property. If “true” the actual system/computer time will be included in every log entry.
- LogFormat – a list of get method names of the class LogRecord. It allows you to specify what should compose your log entries. Typically you would specify just “getMessage” or “getLevel;getMessage“.
- ShutStandardLogger – a boolean property. If “true” it will shut CloudSim’s standard logger. This is useful, when the standard logger generates too many log messages and causes the simulation execution to slow down significantly.
Consider the following example:
FilePath=/mydesktop/log.log
LogLevel=INFO
LogCloudSimClock=true
LogReadableSimClock=false
LogRealTimeClock=true
LogFormat=getMessage
ShutStandardLogger=true
Given this configuration, CustomLog will output only log entries with level higher than INFO, will print the current time, and the current CloudSim simulation time and will shut the standard CloudSim logger. The output will be written to the file /mydesktop/log.log. Thus if you call:
CustomLog.printf(&quot;Hello %s&quot;, &quot;World&quot;);
the output in the file will be something like this.
22:42:51 0.00 Hello World
If all you want to see is the message and not the current time, you need to switch LogCloudSimClock and LogRealTimeClock to “false”.
At any point during the simulation you can redirect CustomLog to another file or the standard output, by simply calling one of the following:
// Redirects to stdout ...
CustomLog.redirectToConsole();
// Redirects to a file, overwrites it
CustomLog.redirectToFile(&quot;...your file...&quot;);
// Redirects to a file, appends to it
CustomLog.redirectToFile(&quot;...your file...&quot;, true);
CustomLog has a lot of convenient methods for printing and formatting log messages and you can explore to see what’s there. As I mentioned it can use TextUtil to print well formatted CSV files. So if you have a list of objects (e.g. cloudlets or VMs) you can convert them to a CSV with a single line of code, by using the printResults method. The following example demonstrates this:
List&lt;Vm&gt; vms = ......
CustomLog.redirectToFile(&quot;... your CSV file ...&quot;);
CustomLog.printResults(Vm.class, vms);
The printResults method is overloaded, so it can take property names and virtual properties, analogously to TextUtil.
Conclusion
In this article we just scratched the surface, by introducing CloudSimEx, explaining how to install it and overviewing some of its basic functionalities. In subsequent articles I’ll talk about how CloudSimEx allows for I/O operations simulation, web session modelling, running multiple experiments in parallel and utilities for modelling Internet latencies … so stay tuned 🙂
References